The German HEIDENHAIN CNC system is called "BMW" in CNC machine tools with its friendly man-machine interface and practical innovative functions. The HEIDENHAIN iTNC 530 CNC system is a versatile contouring CNC system for milling, drilling, boring and machining center machines from HEIDENHAIN. In addition to the friendly and simple dialog format programming language, the iTNC 530 CNC system has a fully digital design that allows all components to be connected via a pure digital interface with high reliability.
In the equipment management and maintenance practice, like other CNC systems, iTNC 530 can also cause accidental modification or even deletion of machine parameters, PLC programs, NC programs and tool data due to unexpected reasons such as misoperation, thus making the machine tool Some functions are lost or even the whole machine is paralyzed. It is an important task to do a good job of backing up machine data. When the above situation occurs, restoring the backup data can quickly restore the function of the machine. Therefore, mastering the operation methods of data backup and recovery is an indispensable skill for equipment management and maintenance personnel.
1. Establish a connection between your PC and the iTNC 530
The iTNC 530 system can establish a network connection with a personal computer using an Ethernet interface, an RS232 interface, and an RS422 interface. This document discusses the backup and recovery method of the iTNC 530 system using the Ethernet interface. Backing up and restoring the machine data of the iTNC 530 CNC system requires the installation of the HEIDENHAIN transmission software TNCremoNT on the PC. When connecting using the Ethernet interface, use a crossover cable to connect the Ethernet interface of the PC to the X26 Ethernet interface of the iTNC 530. The last segment of the IP address of the personal computer and the iTNC 530 must be different, and the other segments must be the same. According to the relevant information of HEIDENHAIN, it is recommended that the last segment of the personal computer IP address be 1 or 1 larger than the last segment of the iTNC 530 IP address. The subnet mask of the personal computer and the iTNC 530 IP address must be the same. For example, an iTNC 530 system has an IP address of 192.168.10.13, a subnet mask of 255.255.255.0, a personal computer with an IP address of 192.168.10.12, and a subnet mask of 255.255.255.0.
The specific process for establishing an Ethernet connection between a personal computer and the iTNC 530 is as follows:
(1) Turn on the external memory switch of the iTNC 530. After the iTNC 530 CNC system is started, press the MOD function key “MOD†on the display unit, then press the right end of the expansion button and select the “External Storage Switch†horizontal soft key to set it to the “ON†position. This switch is the setting switch for the iTNC 530 to communicate with the outside.
(2) View the IP address and subnet mask of the iTNC 530. Press the “Program Edit†button on the iTNC 530 man-machine interface to enter the file editing page, press the MOD function key “MODâ€, enter the password “NET123â€, press the Enter key to confirm, and then press the horizontal soft in the new screen. The key "DEFINE NET", you can see the IP address and subnet mask of the iTNC 530. For example, an iTNC 530 system has an IP address of 192.168.10.13 and a subnet mask of 255.255.255.0. This address should be remembered and will be used later.
(3) Ethernet communication settings on the personal computer. Open the control panel on your PC, double-click "Network Connection", right-click "Local Area Connection" in the pop-up "Network Connection" window, click "Properties" in the drop-down menu, in the "Local Area Connection Properties" dialog box that pops up. Select "Internet Protocol (TCP/IP)", click "Properties", select "Use the following IP address" in the "Ieternet Protocol (TCP/IP) Properties" dialog box that opens, and write the individual in the IP address field. The IP address of the computer: 192.168.10.12, the subnet mask column is written to 255.255.255.0, and then click "OK", as shown in Figure 1.
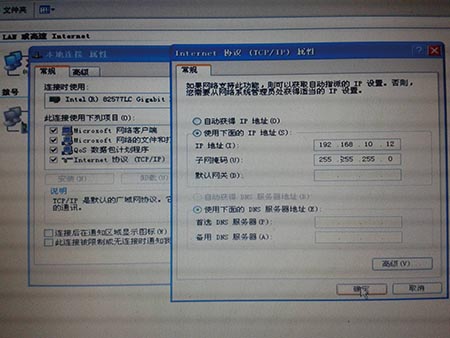
Figure 1 Setting the Ethernet properties and IP address of the PC
(4) Communication settings in the transfer software TNCremoNT. Open the transfer software TNCremoNT, click the menu command Extras, select Configuration from the drop-down menu, select the Connection tab in the pop-up "Configuration" dialog box, select "Ethernet Connection (TCP / IP)", as shown in Figure 2.
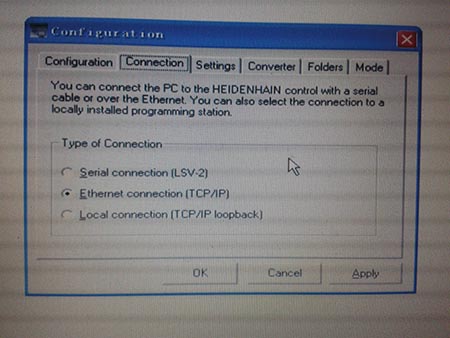
Figure 2 Select Ethernet connection in TNCremoNT
In the "IP Address/Host Name" column of the Settings tab, fill in the IP address of the iTNC530: 192.168.10.13, and then click "OK", as shown in Figure 3.
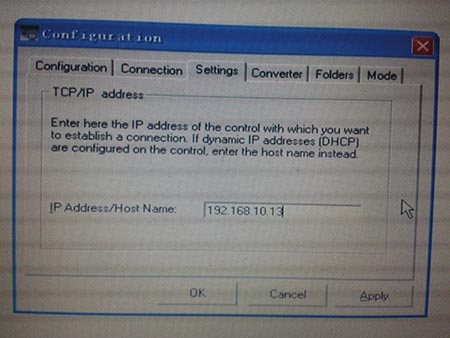
Figure 3 Setting the IP address of the iTNC 530 in TNCremoNT
After setting the IP address of the iTNC 530, click the menu command File and select Connect from the drop-down menu to establish a network connection between the PC and the iTNC 530. After the connection is successful, the files in the CNC system will be displayed in the lower window of the TNCremoNT software, as shown in Figure 4.
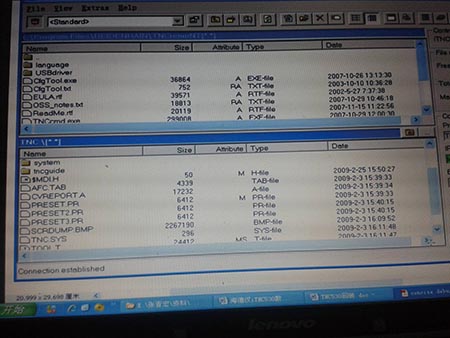
Figure 4 TNCremoNT successfully establishes a connection with iTNC 530
2. Backup of machine data
Once the iTNC 530 is successfully connected to the PC, the machine data can be backed up. In the window of TNCremoNT software, click the menu command Extra, select Backup/Restore... from the drop-down menu, and TNCremoNT pops up the “TNCbackup†window, as shown in Figure 5.
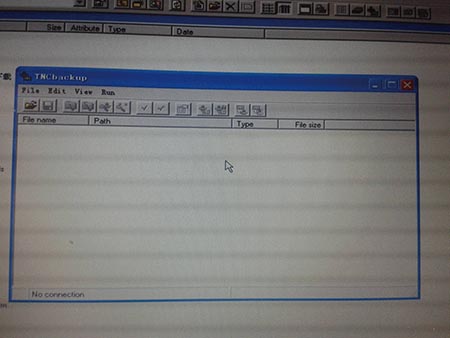
Figure 5 "TNCbackup" window
In the "TNCbackup" window, click the menu command File, select Scan file list / All control files from the drop-down menu, then the "Login for PLC access" dialog box will pop up, ask to enter the PLC edit password, as shown in Figure 6.
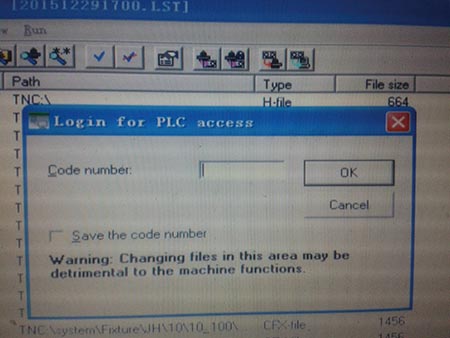
Figure 6 "Login for PLC access" dialog
Write the PLC edit password in the "code number" column of the "Login for PLC access" dialog box and click the "OK" button to confirm. The "Login for PLC access" dialog disappears and TNCremoNT will list the files to be backed up in the iTNC530 in the "TNCbackup" window, as shown in Figure 7.

Figure 7 Files to be backed up in the iTNC 530
Finally, in the "TNCbackup" window, click the menu command Run, select Backup / Restore... from the drop-down menu, TNCremoNT pops up the "Save backup file" window, as shown in Figure 8.

Figure 8 "Save backup file" window
In the "Save backup file" window, enter the path to store the backup file and the name for the backup file, such as "backup20090301", click the "Save" button, the progress bar of the backup will be displayed, as shown in Figure 9.

Figure 9 backup progress bar
After the backup is complete, two files will be displayed in the folder where the backup files are stored: backup20090301.lst and backup20090301.bck. The previous file is a list of all files in the system, and the latter file is compressed data of all files.
3. Recovery of machine data
To restore the machine data, after establishing the connection between the iTNC 530 and the PC, click the menu command Extra in the window of the TNCremoNT software, select Backup/Restore... from the drop-down menu, and TNCremoNT pops up the “TNCbackup†window, as shown in Figure 5. Show. In the "TN-Cbackup" window, click the menu command File, select Open file list... from the drop-down menu, and TNCremoNT pops up the "Open backup of file list" window. In the "Open backup of file list" window, select the path to restore the file and select the recovery file with the suffix .lst, as shown in Figure 10.
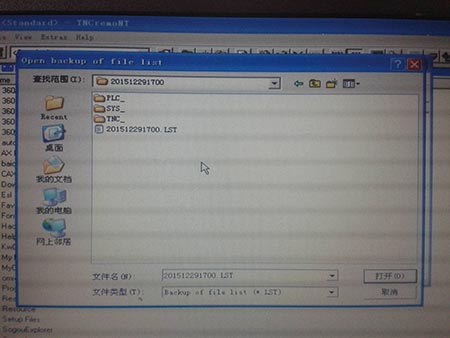
Figure 10 Selecting a pre-recovery file in the "Open backup of file list" window
After selecting the file to be restored, click the "Open" button in the "Open backup of file list" window and the "Open backup of file list" window disappears. In the "TNCbackup" window, TNCremoNT will list the files to be restored, as shown in Figure 11.
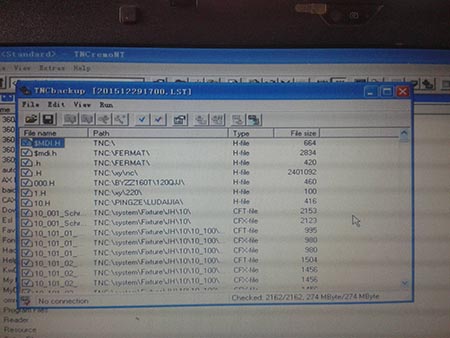
Figure 11 List of files to be restored in the TNCbackup window
In the "TNCbackup" window, click the menu command Run, select Restore... from the drop-down menu, and TNCremoNT will pop up the "Login for PLC access" dialog box shown in Figure 6, asking you to enter the PLC edit password. After entering the PLC edit password in the "Login for PLC access" dialog box, TNCremoNT will also pop up another dialog box, indicating that all files in the iTNC 530 system will be overwritten and the system will be restarted. Select "OK" or " Yes". Subsequently, TNCremoNT began the data recovery process.
During the data recovery process, TNCremoNT will also pop up a number of dialog boxes asking if there is a write-protected file, whether to continue the data recovery after correct processing, and if there are files that cannot be deleted, whether to continue the data recovery after correct processing, this When you select "No", recovery can continue, as shown in Figure 12.

Figure 12 TNCremoNT asks for the processing of write-protected files during data recovery
4. Conclusion
Doing a good job of backing up the data of CNC machine tools is an important task that must be done. Mastering the methods of data backup and recovery of CNC machine tools is an indispensable skill for equipment management and maintenance personnel. Not long ago, a WRF160 machining center produced by the Czech company of the company was estimated to have an alarm No. 5338 due to misoperation: the soft key planning was not compiled, and the SPJ file was checked. This alarm caused the machine function to be completely lost. After the PLC file is compiled, the iTNC 530 reports 20 error messages. Locating and processing these 20 error messages may require more specialized knowledge. In the actual processing, the author has restored the data backup of the machine tool that was usually done, and easily restored the functions of the machine tool.
references:
[1] Dr. Johannes Heidehan (China) Co., Ltd. iTNC 530 Concise Manual [E]. Beijing: Dr. Johannes Heidehan (China) Co., Ltd., 2009.
[2] Dr. Johannes Heidehan (China) Co., Ltd. iTNC 530 HSCI HSCI Hardware System New Features [E]. Beijing: Dr. Johannes Heidehan (China) Co., Ltd., 2011.
[3] DR.JOHANNES HEIDENHAIN GmbH. iTNC 530 Service Manual[E]. Germany: DR.JOHANNES HEIDENHAIN GmbH., 2006.
Vetiver oil has amber-brown color and it`s described as a sweet, woody and smoky fragrance that similar to patchouli oil and sandalwood Essential Oil, the odor of vetiver develops and improves with aging, and the scent varies depending on the plant`s location. Vetiver oil is known as a sacred herb valued because of its uplifting, soothing, healing and protective properties. It`s a natural body cooler that is also known as the 'oil of tranquility' because of its calming properties. It is a popular ingredient for soaps, toiletries and perfumes.
Vetiver Essential Oil,Natural Vetiver Essential Oil,Pure Vetiver Essential Oil,Organic Vetiver Essential Oil
Xinhui Gangzhou Flavors&Fragrance Co.,Ltd , https://www.xhgzff.com